Installing Firmware Updates
These instructions apply to the following JDS Labs XMOS based DACs:
- Element III MK2
- Element III
- Element II
- EL DAC II
- EL DAC II+
- Atom DAC
- Atom DAC+
- Atom DAC 2
Please note that Element IV firmware is installed through Core! Instructions here do not apply to Element IV.
You may install any version of firmware for your DAC; there is no need to install versions sequentially. Version numbers are used for identification purposes only.
We encourage updating through the XMOS DFU app for Windows 10/11. Installing in macOS and Linux is supported by the jdslabs/xmos_dfu loader, which is a command line tool.
WARNING
These tools only check for a valid JDS Labs device before loading firmware to your DAC. The software does not check the .bin file you supply, nor can it check that the DAC matches the .bin file you provide. Thus, triple check that you are loading the right firmware for the right model! In the event that you accidentally load firmware for the wrong JDS Labs DAC, you can possibly recover by flashing the intended firmware. If not, please reach out for help.
General Tips
- A direct connection to a USB 2.0/3.0 port is required. USB hubs and some Type C or USB 3.1 ports may prevent DFU communication.
- Only connect one (1) JDS Labs DAC at a time.
- Your DAC will automatically restart upon completion.
- In the rare event that an update fails, it is safe to power cycle. Your DAC will fallback to factory firmware. Please reach out to support if you are unable to upgrade and we will be glad to assist further.
Windows
Instructions for Win 10/11- Begin by installing the latest XMOS Drivers for your DAC if you have not done so already (v5.62.0 for Win 10/11).
- Connect your DAC directly to a USB port on your computer. Connecting through a USB hub or USB port on your monitor can prevent the update app from establishing a connection.
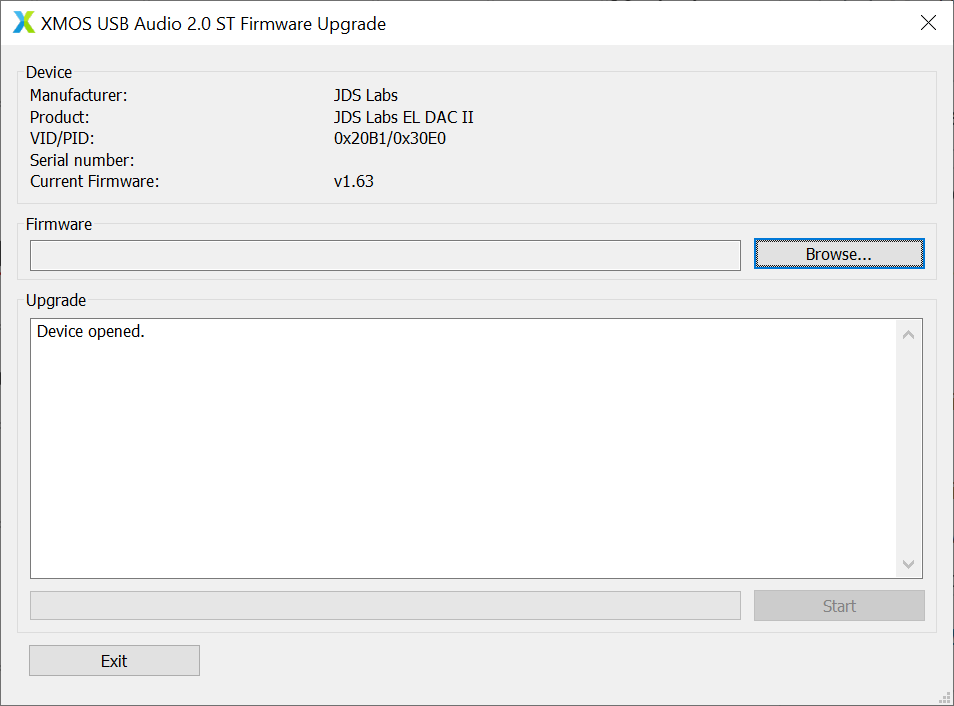
- Download, unzip, and open the XMOS Firmware Update Utility. This download contains both x64 and x32 versions. Open the appropriate version for your system
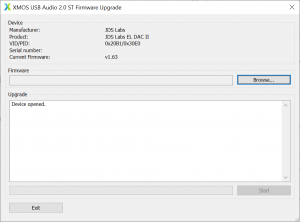
- Download a new firmware from jdslabs.com. If the file is compressed in a .zip archive, be sure to extract the .zip file to obtain the firmware .bin file.
- Click Browse and select the .bin file you have downloaded from jdslabs.com.
- Start Start. You should see the version number change upon completion.
Instructions for Win 7/8
- Begin by installing the latest XMOS Drivers for your DAC if you have not done so already (v4.13.0 for Win 7/8).
- Connect your DAC directly to a USB port on your computer. Connecting through a USB hub or USB port on your monitor can prevent the update app from establishing a connection.
- In older XMOS driver v4.13.0, the DFU update is found in the directory where you installed the XMOS drivers, by default:
Element II
C:\Program Files\XMOS\USBAudioStDriver_30DA\W10_x64\xmosusbaudiost30DA_dfuapp.exe
EL DAC II(+)
C:\Program Files\XMOS\USBAudioStDriver_30E0\W10_x64\xmosusbaudiost30E0_dfuapp.exe
Atom DAC(+)
C:\Program Files\XMOS\USBAudioStDriver_30E1\W10_x64\xmosusbaudiost30E1_dfuapp.exe
- Click Browse and select the .bin file you have downloaded from jdslabs.com
- Start Start. You should see the version number change upon completion.
macOS
Instructions for macOS Sonoma or SequoiaPrerequisites
- Install XCode Command Line Tools, from a command line:
xcode-select --install - Install Homebrew, and be sure to follow the suggestion at the end to add Homebrew to your PATH.
- Install libusb:
brew install libusb
Loading Firmware in macOS Sonoma or Sequoia
- Open Terminal and clone the jdslabs/xmos_dfu firmware utility:
git clone https://github.com/jdslabs/xmos_dfu.git - Navigate to the cloned directory:
cd xmos_dfu/xmos_dfu - Run the following command to compile, using the appropriate target for your system. You may ignore the warnings.
make -f Makefile mac - Obtain permission to run the script by entering these commands:
chmod +x setup.sh
chmod +x xmosdfu
source setup.sh
- Make sure your DAC is connected by USB, then run the following command to verify the connection and check the current firmware version. Your DAC will appear as “VID = 0x20b1” or “VID = 0x152A”:
./xmosdfu --listdevices - To flash new firmware, download a desired .bin, then run the command below. You will need to edit the command to reflect the full path of your downloaded firmware file: select the downloaded file in Finder, then right click on its path in the bottom of the window and choose Copy <filename> as Pathname.
sudo ./xmosdfu --download "/replace/this/path/ReplaceThisFirmwareFilename.bin"After a few seconds, your DAC will reboot and you will see the following confirmations:

Linux
Instructions for Ubuntu 20.0.4Prerequisites
- Install libusb:
sudo apt-get install libusb-1.0-0-dev
Loading Firmware in Ubuntu 20.0.4
- Open a terminal and clone the jdslabs/xmos_dfu firmware utility:
git clone https://github.com/jdslabs/xmos_dfu.git - Navigate to the cloned directory:
cd xmos_dfu/xmos_dfu - Compile the code. You may ignore the warnings:
make -f Makefile linux
- Run the command:
source setup.sh
- Make sure your DAC is connected by USB, then run the following command to verify the connection and check the current firmware version. Your DAC will appear as “VID = 0x20b1” or “VID = 0x152A”:
./xmosdfu --listdevices
- To flash new firmware, download the desired file, then run the command below as
sudo. You will need to edit the path to reflect the full path of your downloaded firmware file.sudo ./xmosdfu --download "/edit/this/path/Atom_DAC_Plus-v184-LockedVolume.bin"
